
Making your website static and HTML cached on Cloudflare servers is one of the best ways to reduce TTFB. I literally saved around 900 ms of loading time (TTFB) using this trick on WP Cloudflare Super Page Cache. The best part is that no matter where my hosting server is, I get around 30 to 300ms load time around the globe. Your website static image is cached and saved on 193 Cloudflare servers across the world.
- Problems When Cached Everything is 'On' on Cloudflare
- The Solutions
- On GTmetrix
- On Performance Test by KeyCDN
- Requirements to Use Super Page Cache For Cloudflare
- How To Install And Activate the Plugin?
- Setting Up Information Required To Start The Plugin
- Getting API Key From Cloudflare's Website
- Setting Up Information Required To Start The Plugin (Continued)
- Recommended Settings For WP Cloudflare Super Page Cache
- Summing up
Problems When Cached Everything is ‘On’ on Cloudflare
For a blog:
- Issues with Ajax and jquery
- Posts likes, Emojis Reaction, social media counter which needs regular refreshes gets static and shows error
- WordPress native comment system not working and login user visible on comments
- WordPress top admin bar is shown to non-logged-in users
- The website does not show any new content or changes
For an eCommerce website:
- Same issues as above
- My cart getting cached for all users
The Solutions
Solution #1: Move from Cloudflare Free to the $200 Business plan which allows you to bypass cookies.
Solution #2: Install such a plugin that can bypass the cache for login users on Cloudflare’s free plan.
WordPress offers multiple plugins including:
- Cloudflare Official plugin – The only recommended plugin for the new Cloudflare APO. Doesn’t automatically purge the cache even when you click on purge. Need to set multiple page rules and install a 3rd party comment system to make the comments work
- WP Cloudflare Cache by Jumedeen Khan – Need to set Cache Everything Page Rule manually
- CF Cache Purger – Not available anymore
- Super Page Cache for Cloudflare by Optimole (previously named WP Cloudflare Super Page Cache) – The best Cloudflare plugin out there. Recently, acquired by Optimole and renamed.
I will always go with Super Page cache for Cloudflare instead of the official Cloudflare plugin because:
- It lets you auto-purge any page and related so that the visitors can see
- Allows you to set up Cloudflare workers
- Options to enable/disable caching some static and dynamic pages
- Preload sitemaps, pages, contents
- Has cache buster for logged-in users (/?swcfpc=1)
- Both server-level cache system as well as a disk-level fallback cache system
- Incredible customization option for what to cache and what not to cache
- Ability to purge OPcache and object cache with Cloudflare cache
- Option to purge only page HTML
- Autoprefetch URLs
- Numerous hosting companies’ compatibility
- The only Cloudflare plugin to work with other caching plugins like WP Rocket
Cloudflare Official Plugin Vs Super Page Cache For Cloudflare (WP Cloudflare Super Page Cache)
| Plugin | Cloudflare | Super Page cache for Cloudflare |
|---|---|---|
| Allows Cache Everything | Yes, need to set it manually | Yes, done automatically |
| Login comment cached problem | Yes, need to install a 3rd party plugin to fix it | No |
| Auto purge | Partially, doesn’t purge related content most of the time | Complete purge |
| Purge OPcache and Object Cache with Cloudflare cache | No | Yes |
| Preload | No | Yes |
| Cache Customization of static and dynamic resources | No | Yes |
| Need To Buy APO To Work Properly | Yes | No, works on Cloudflare free plan |
| Autoprefetch | No | Yes |
| Fallback Cache | No | Yes |
| Compatibility | With hosting companies – Yes With other cache plugins – No | With hosting companies – Yes With other cache plugins – Yes |
| Cloudflare Worker Support | No | Yes |
Cloudflare’s Everything Cache Turned ‘On’ Vs Cloudflare’s Everything Cache Turned ‘Off’ – Speed Test
Website: howtogrowthis.com (still in progress)
Server: Vultr HF 1GB, OpenLitespeed (Litespeed caching feature turned OFF, Cloudflare optimizations are ON)
Location: Paris
On GTmetrix
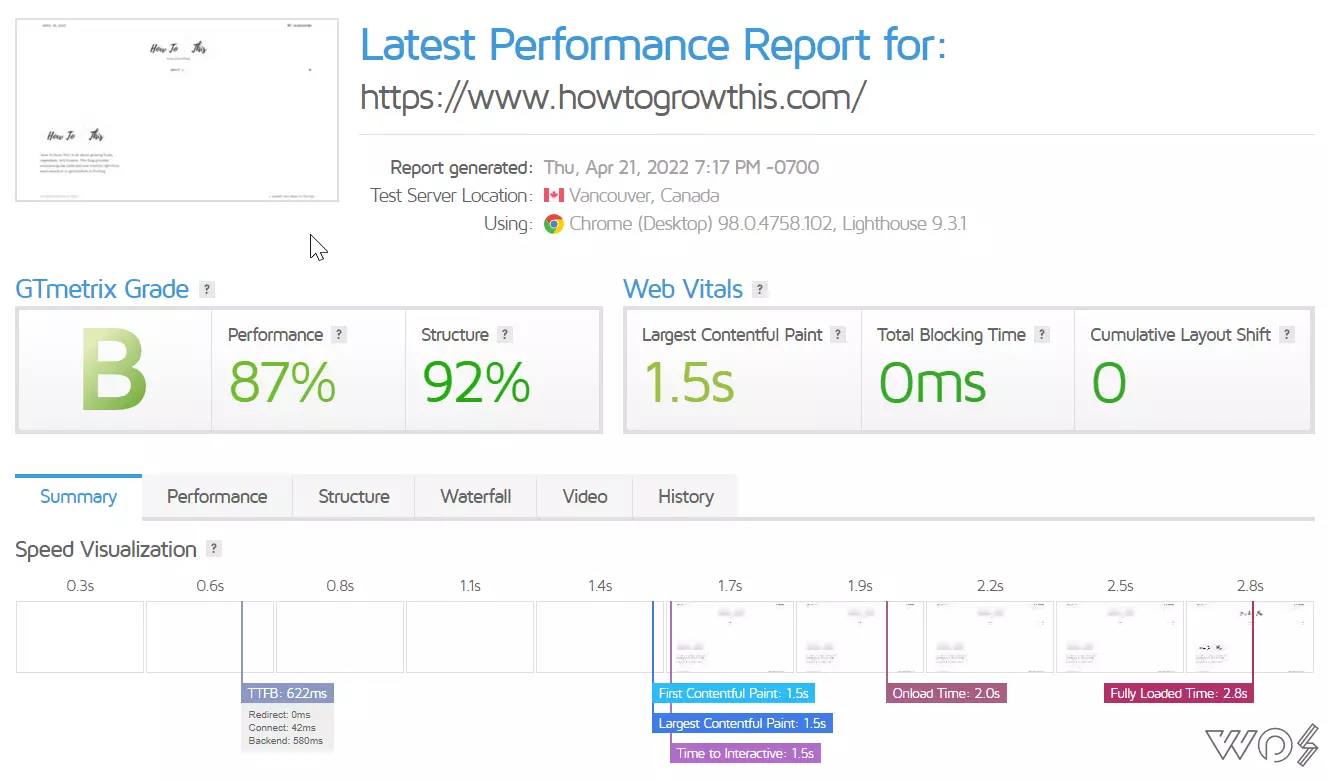
The TTFB when I disabled WP Cloudflare Super Page Cache was 600ms+ on GTmetrix for a website which I manage called ‘howtogrowthis’. The total loading time was around 2.8 seconds.
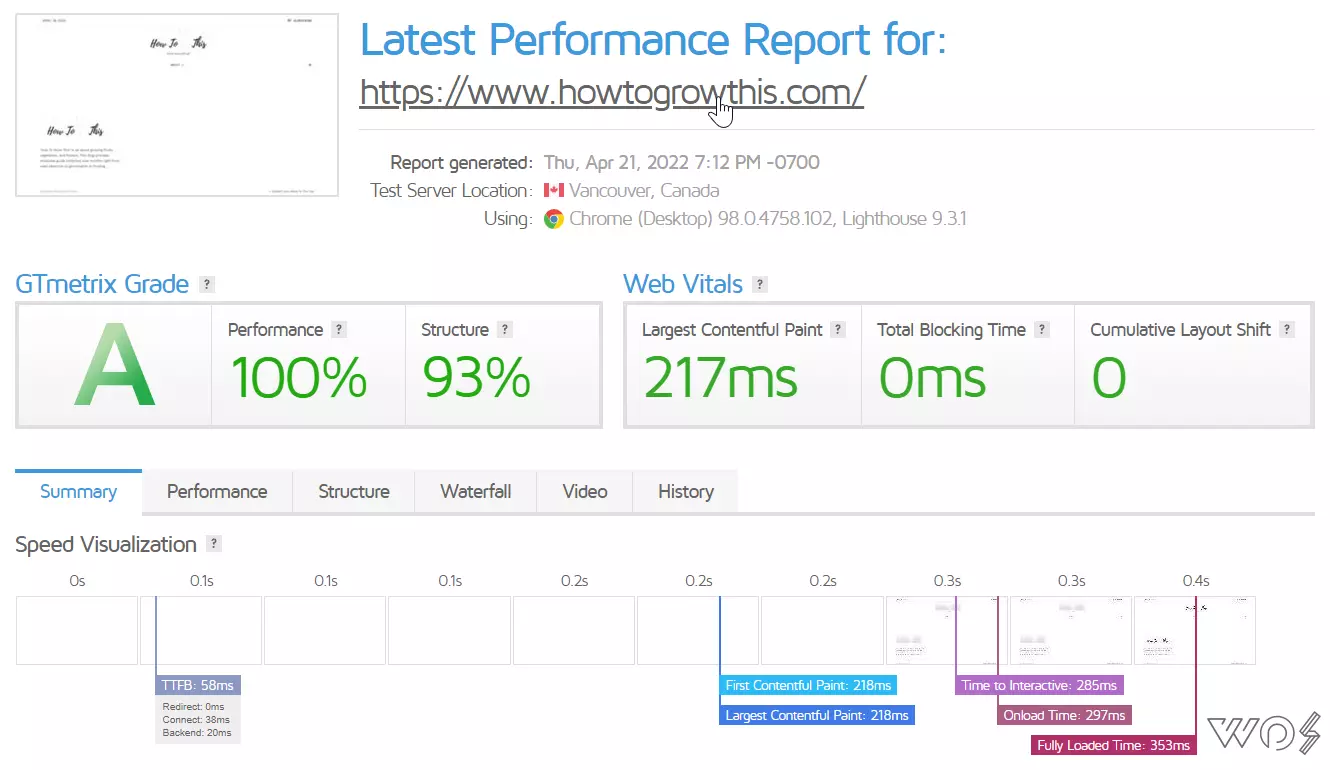
When enabled, the TTFB dropped to 58ms and the total loading time reached a surprising 353ms.
On Performance Test by KeyCDN
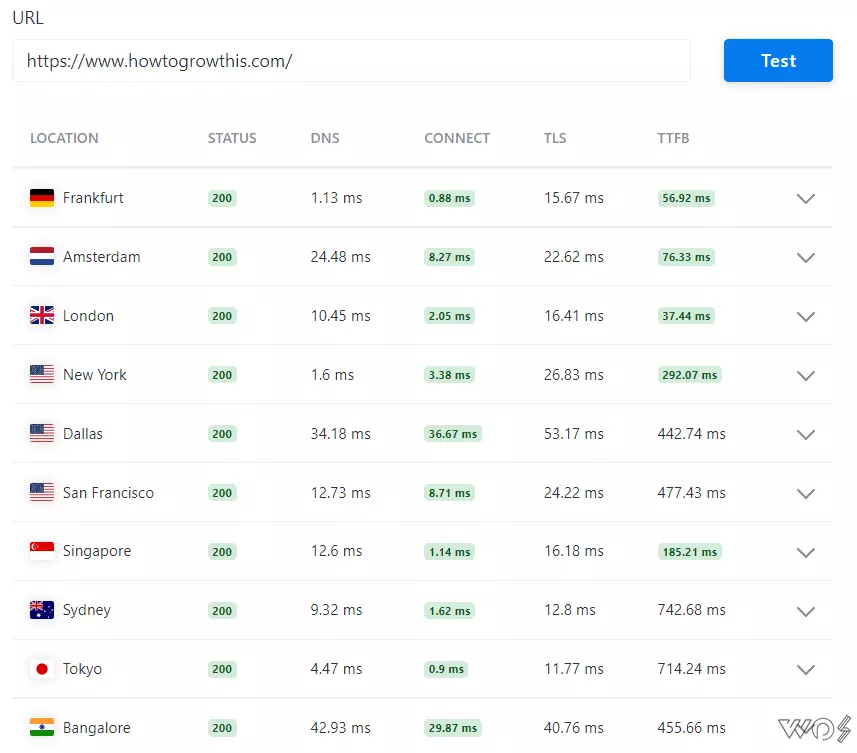
As you can see that the servers closer to Paris (my server location) have a low TTFB. However, once the distance increases the TTFB time also increases.
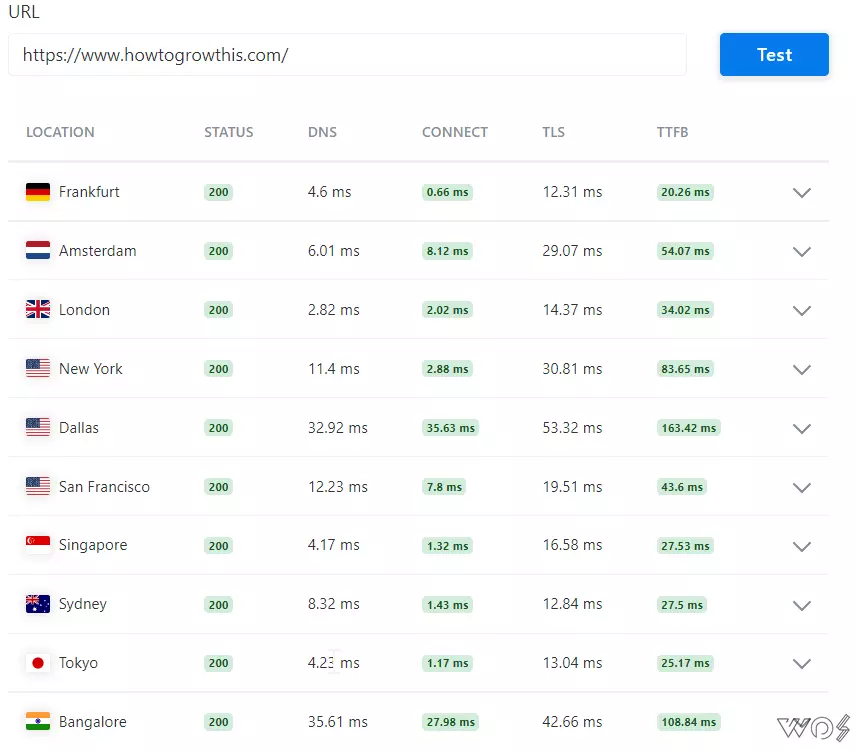
With Cloudflare Cache Everything being managed by Super Page Cache For Cloudflare, the TTFB decreased to an average of 59 ms combining all 10 server locations.
WP Cloudflare Super Page Cache / Super Page Cache For Cloudflare Tutorial
Requirements to Use Super Page Cache For Cloudflare
- A Cloudflare free plan account
- Website DNS and Cloudflare protection activated (by changing the nameservers)
- Only one cache plugin or only one plugin is activated for page caching which will be Cloudflare Super Page Cache, while other plugins such as Litespeed and WP Rocket caching features must be turned off.
- Select ‘Respect Existing Headers’ from >>> Cloudflare website >>> Cache section before working with the plugin
How To Install And Activate the Plugin?
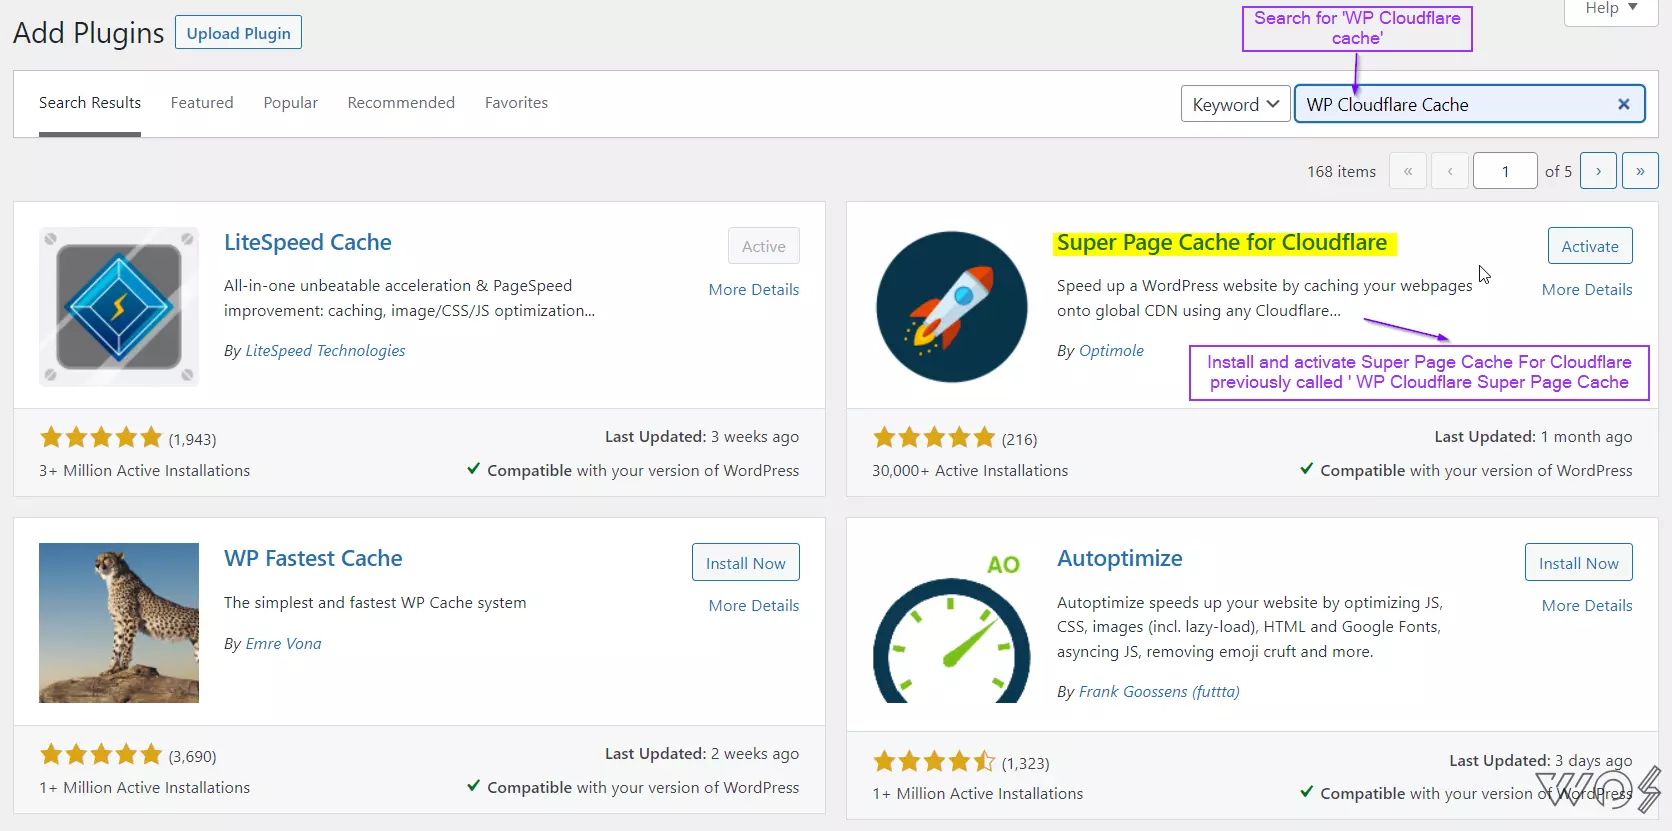
- Go to ‘Add New Plugin’
- Search for either ‘Cloudflare’ or ‘WP Cloudflare Super Page Cache’
- Install the first plugin named ‘Super Page cache for Cloudflare’ with the rocket logo
- Activate the plugin after installing
Setting Up Information Required To Start The Plugin
- Either go to Settings >>> WP Cloudflare Super Page Cache or click the red cloud icon on the WordPress Admin Bar present at the top
- You will be redirected to the dashboard of the plugin and will need to provide your Cloudflare email and global API key to make the plugin work.
Getting API Key From Cloudflare’s Website
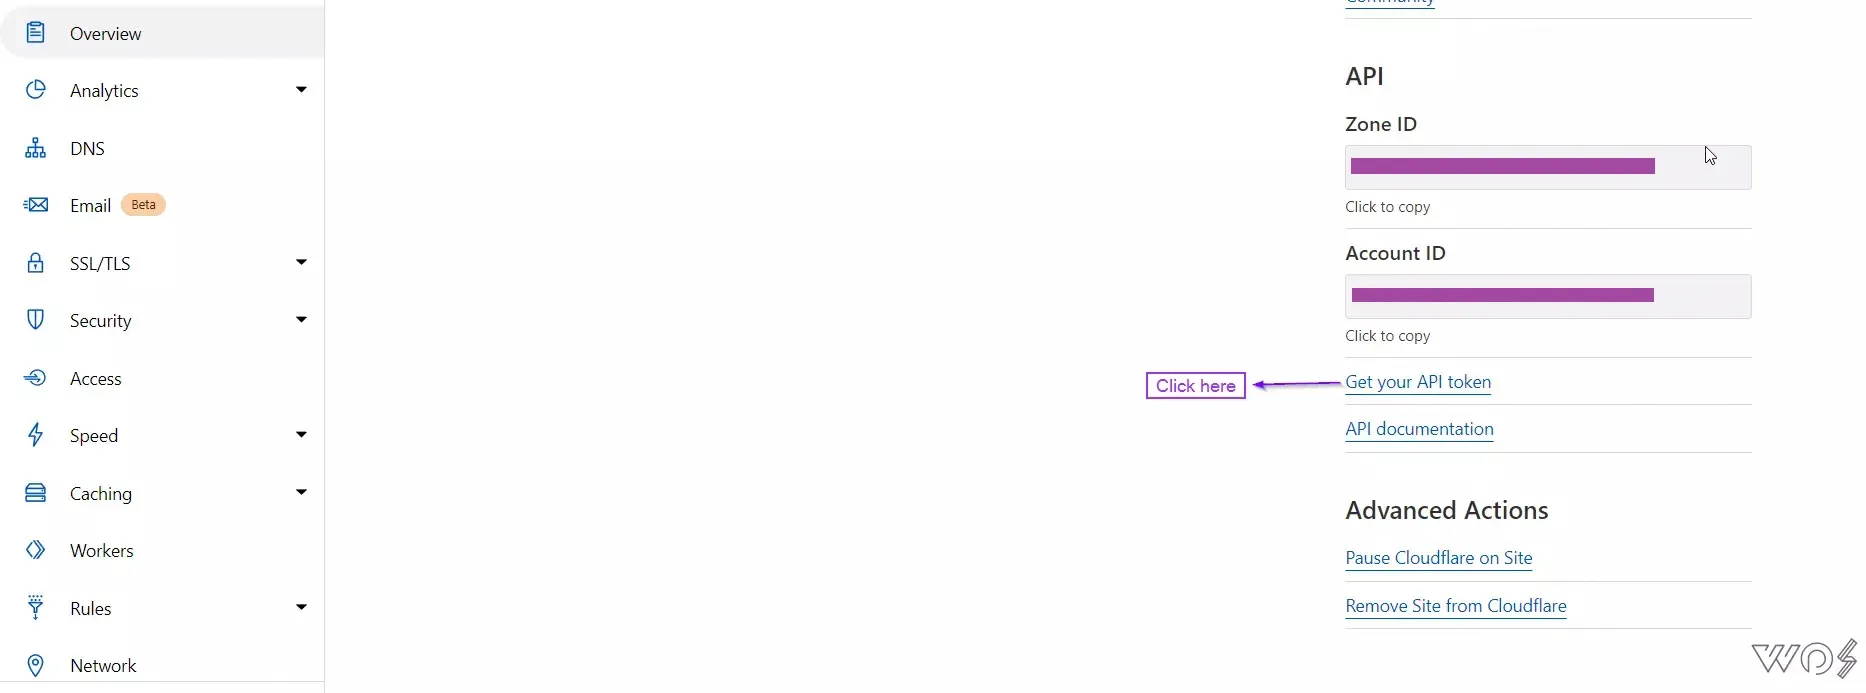
- Login to your Cloudflare account
- Select your website on which you have installed the plugin
- Now you are on the dashboard. Scroll down and look for API Tokens on the right panel
- Click on it and you will be redirected to the API Tokens page
- Go to the ‘API Keys‘ Section and Click ‘View‘ on the ‘Global API Key‘
- Type your password, complete a captcha test and copy the API key
Setting Up Information Required To Start The Plugin (Continued)
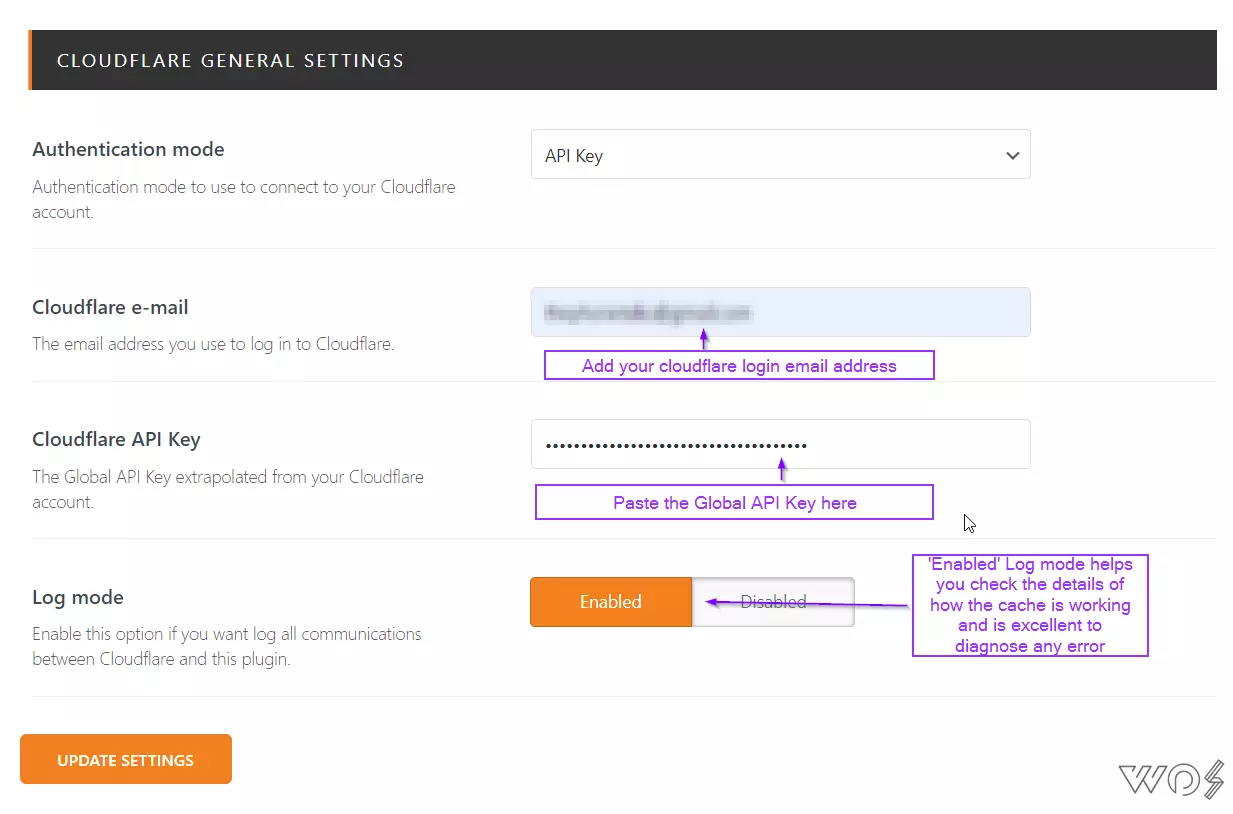
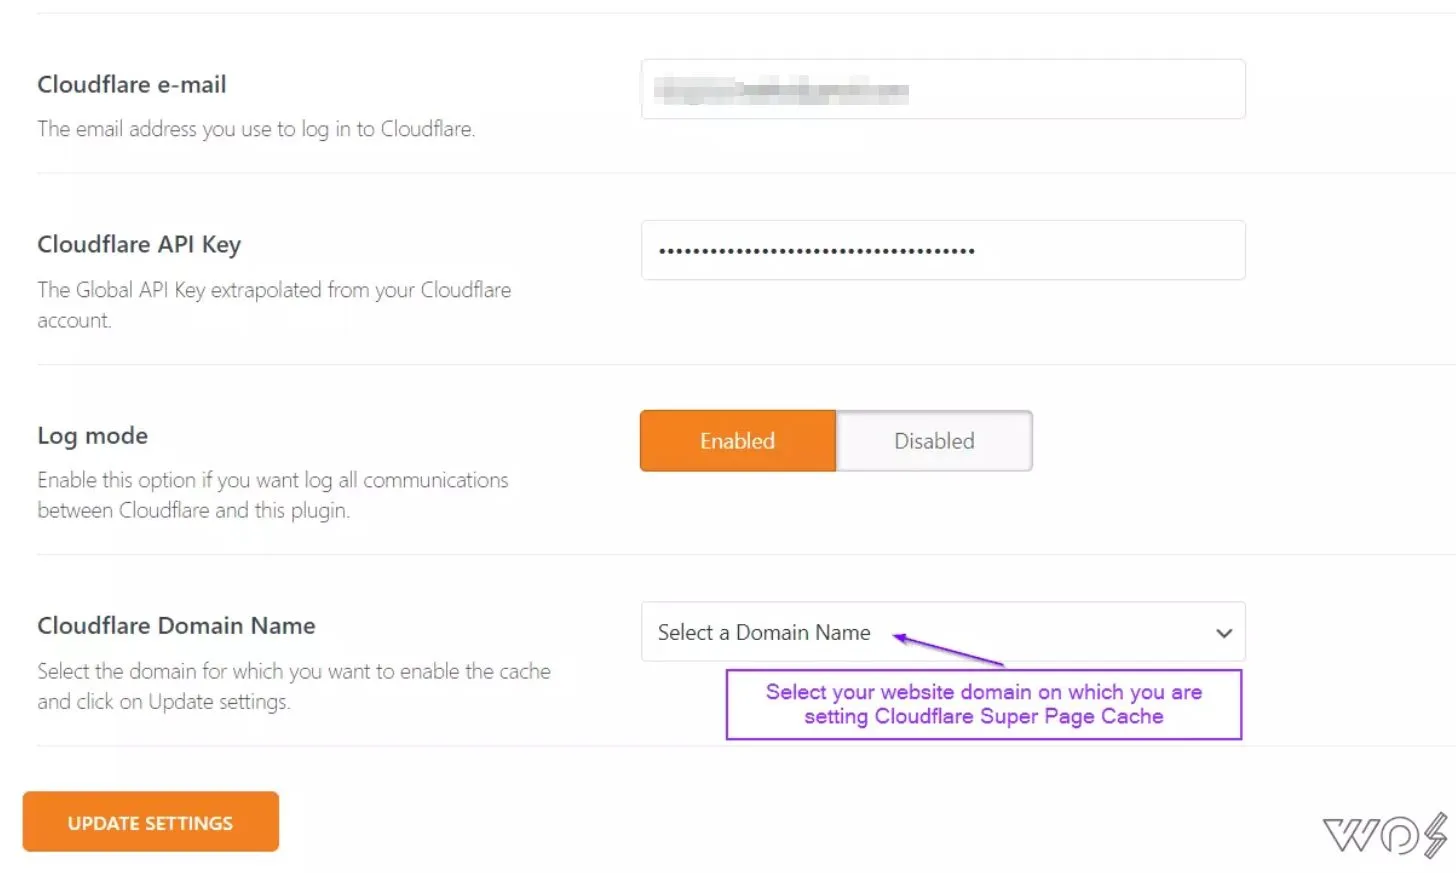
- Paste this key in the ‘Cloudflare API Key’ tab
- Click ‘Update Settings’
- A new tab will appear named ‘Cloudflare Domain Name’, click and select your website
- Click ‘Update Settings’ Again.
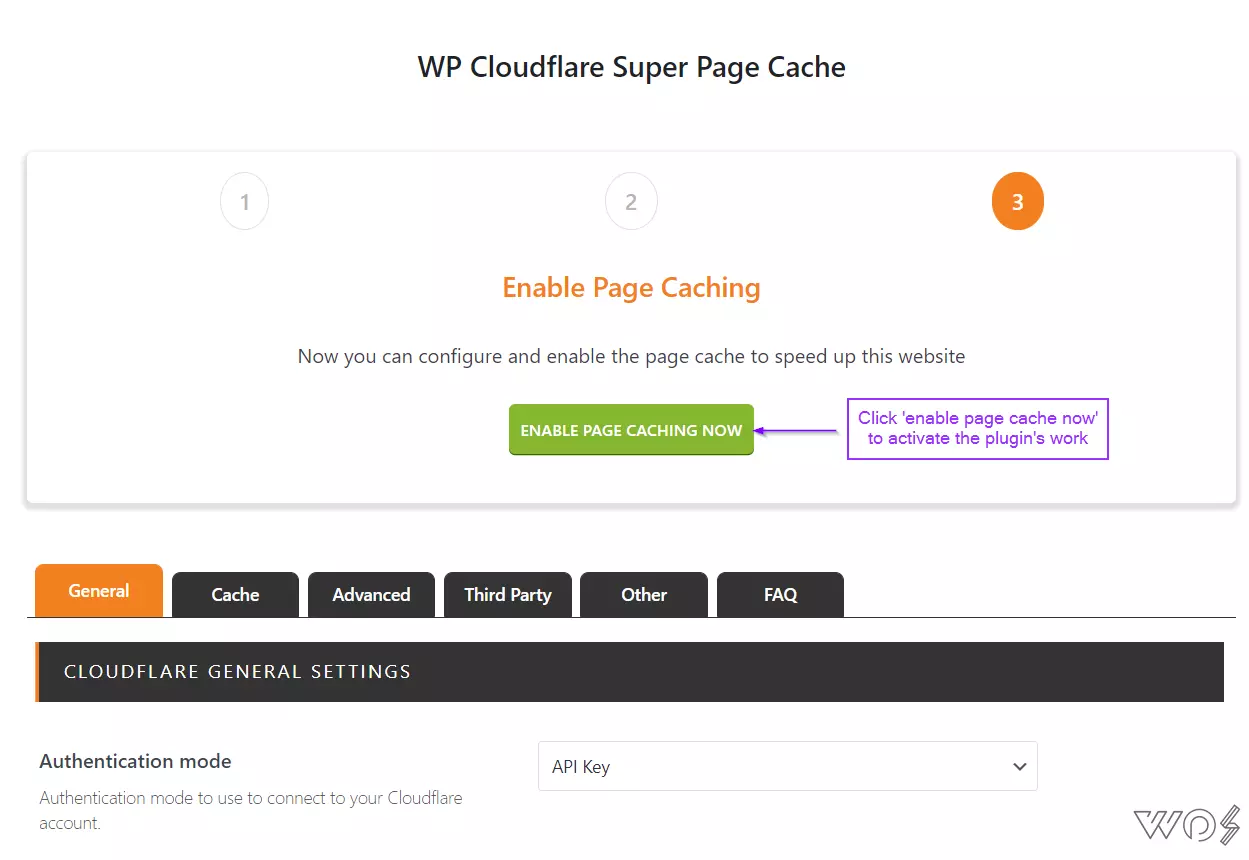
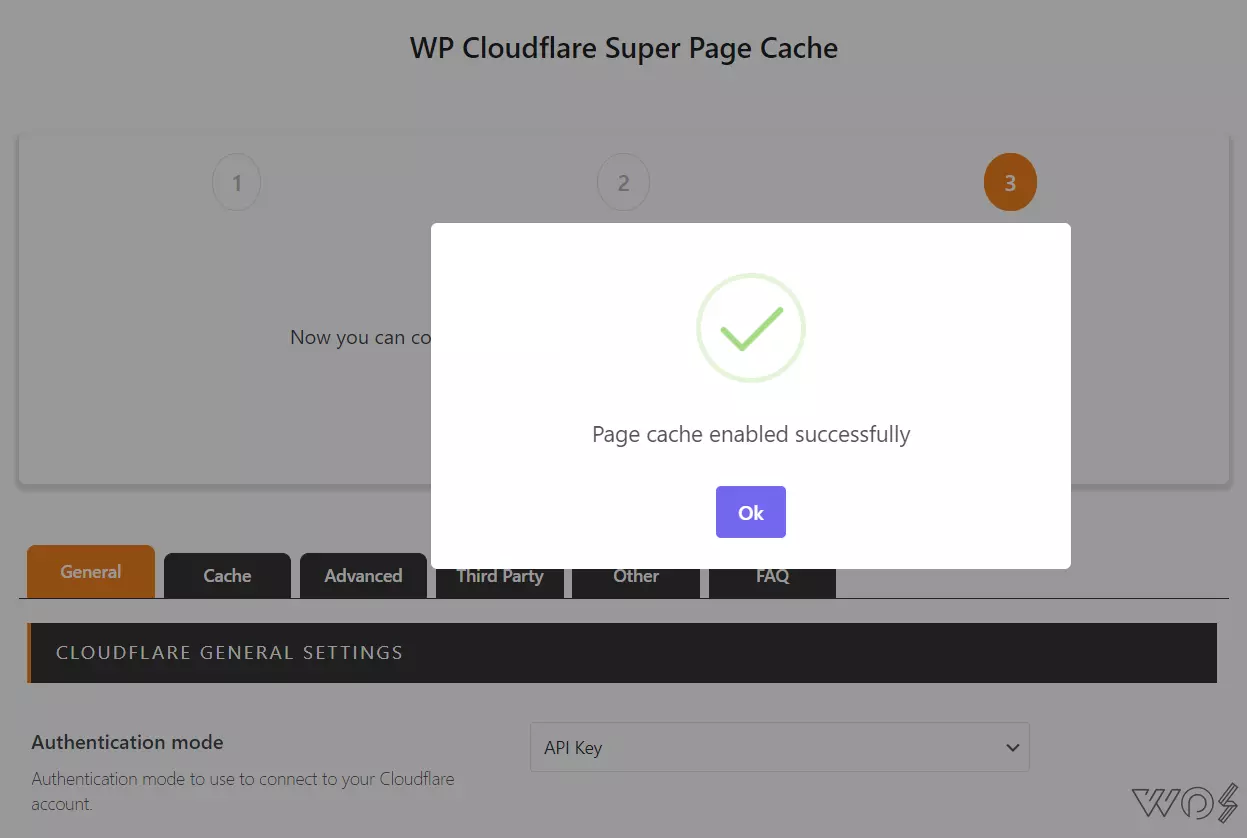
- Click on ‘Enable Page Caching Now’. You will get a pop-up message of page cache enabled successfully
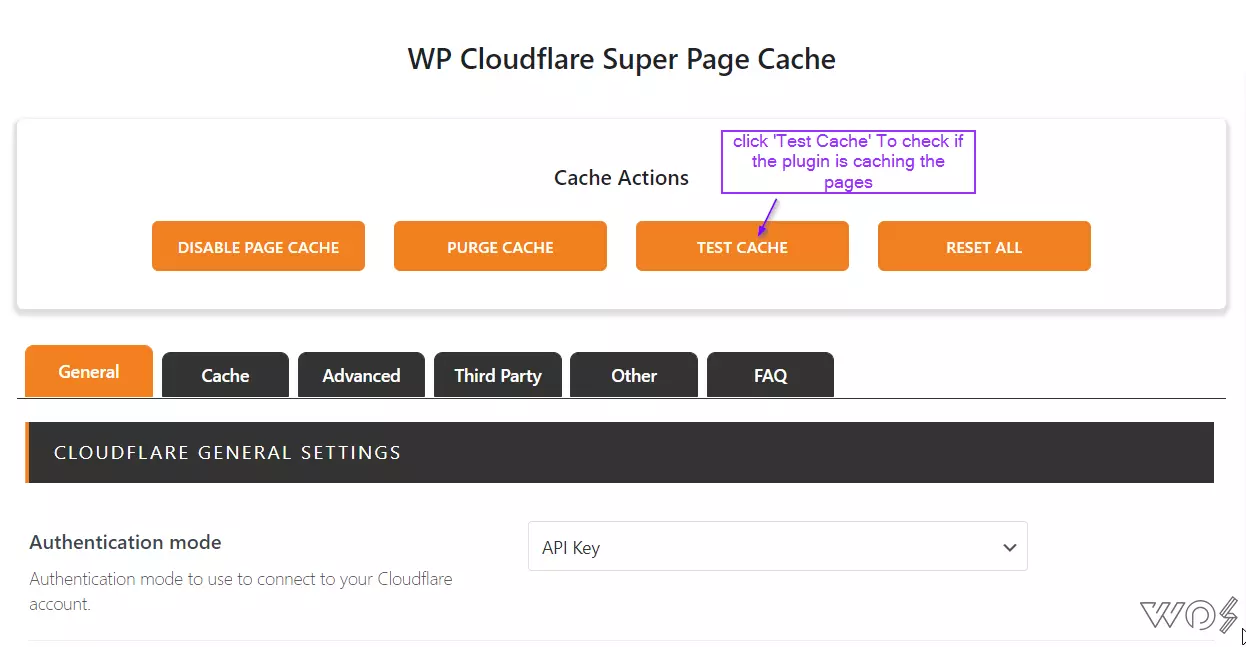
- Click on ‘Test cache’. A pop-up message will appear saying the page cache is working properly
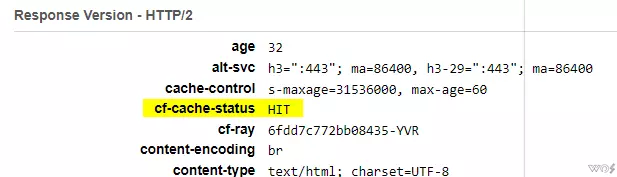
- Double-check if the caching is working by testing your website on GTmetrix or Chrome Dev Tools. In the header section there you will find ‘cf-cache-status HIT‘
Recommended Settings For WP Cloudflare Super Page Cache
Section 1: Cache
CACHE LIFETIME SETTINGS
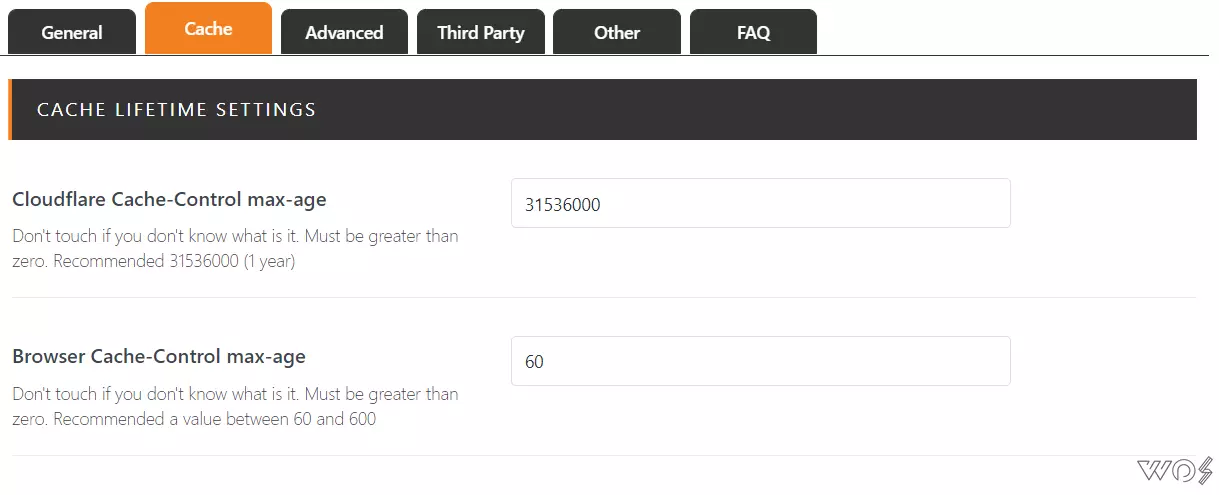
- Cloudflare Cache-Control max-age (in seconds): 31536000 seconds or 1 year (by default). It is the amount of time on how long Cloudflare can store the cached website on its servers. No need to decrease it because the plugin automatically clears the cache if it detects any change.
- Browser Cache-Control max-age (in seconds): 60 (by default). It is the amount of time of how long the browser can store a fetched HTTP response in a cached copy. If you don’t update your website that frequently you can set the value up to 600.
CACHE BEHAVIOR SETTINGS
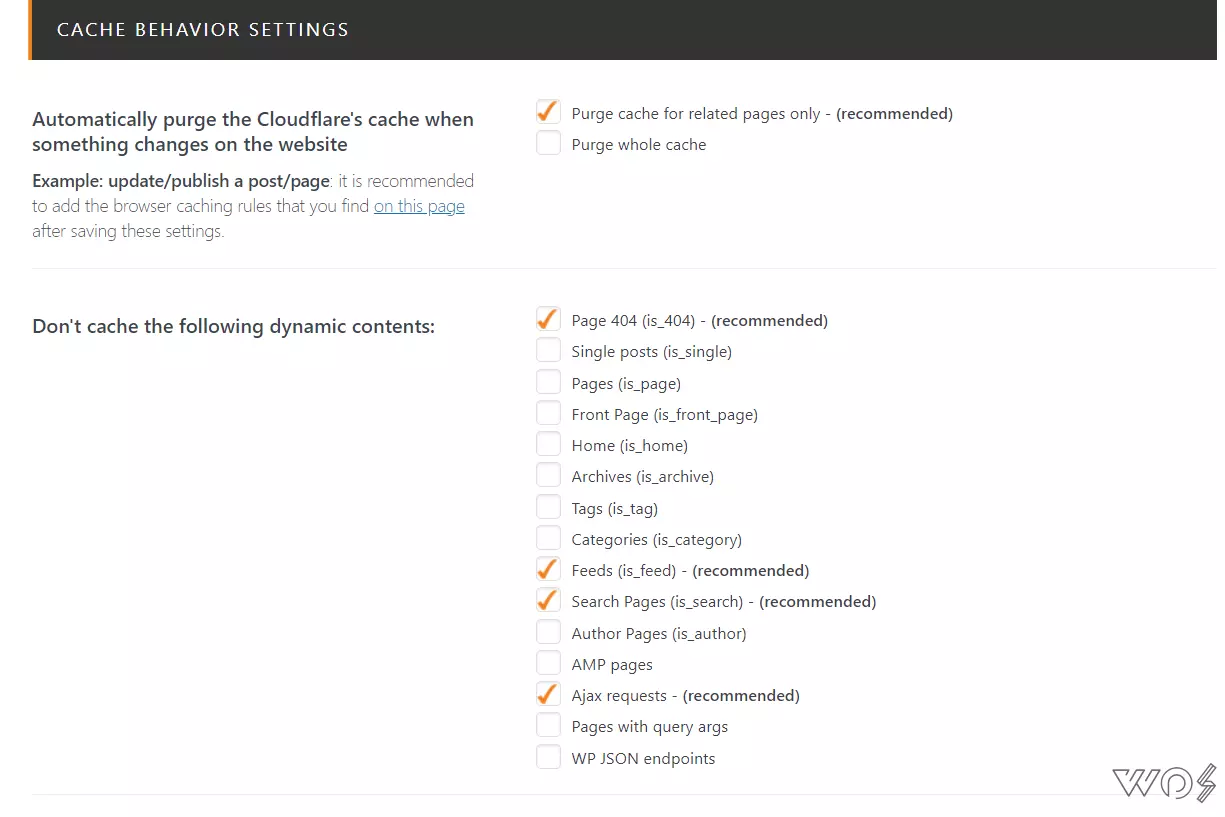
Automatically purge the Cloudflare’s cache when something changes on the website
- Purge cache for related pages only (Check)
- Purge whole cache (Uncheck)
Don’t cache the following dynamic contents:
- Page 404 (is_404) – Check (recommended)
- Single posts (is_single) – Uncheck
- Pages (is_page) – Uncheck
- Front Page (is_front_page) – Uncheck
- Home (is_home) – Uncheck
- Archives (is_archive) – Uncheck
- Tags (is_tag) – Uncheck
- Categories (is_category) – Uncheck
- Feeds (is_feed) – Check (recommended)
- Search Pages (is_search) – Uncheck (recommended)
- Author Pages (is_author) – Uncheck
- AMP pages Ajax requests – Uncheck (recommended)
- Pages with query args WP JSON endpoints – Uncheck
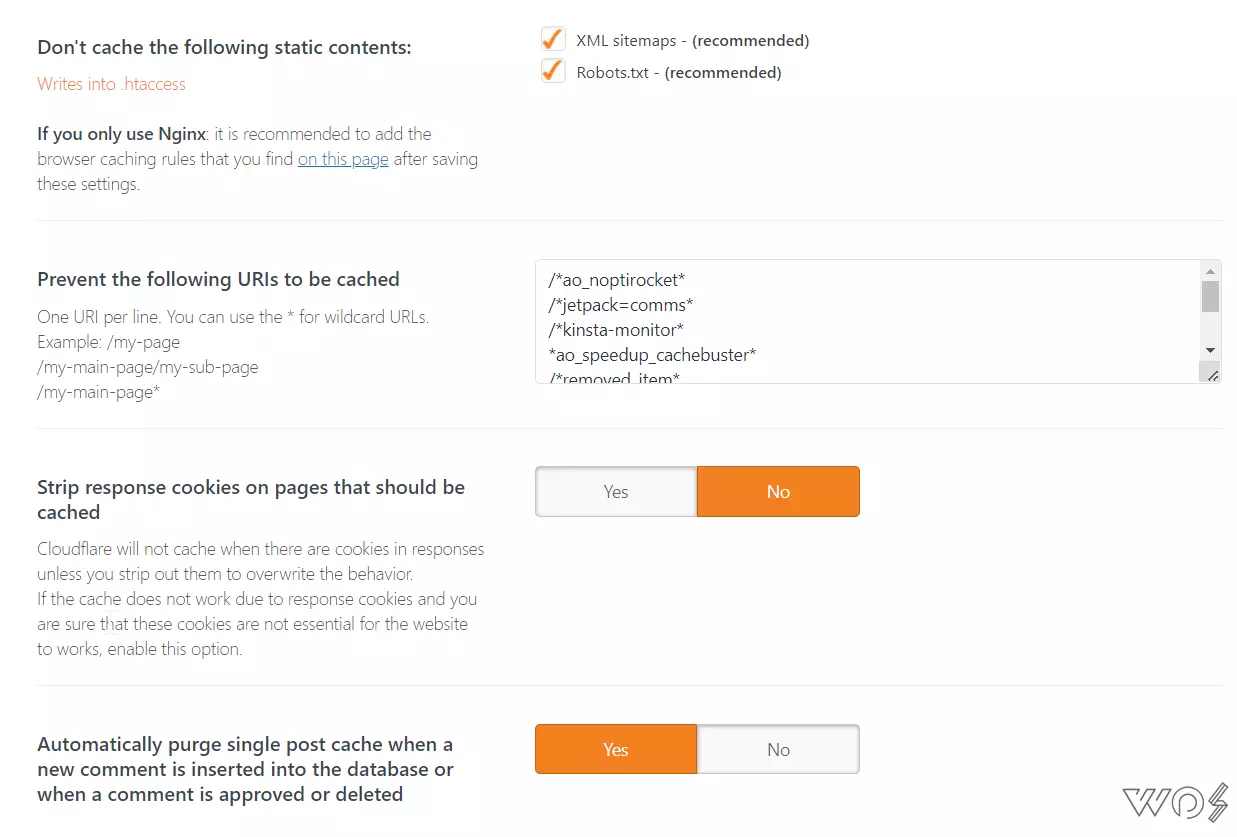
Don’t cache the following static contents:
- XML sitemaps – Check (recommended)
- Robots.txt – Check (recommended)
Prevent the following URIs from being cached
/*ao_noptirocket*
/*jetpack=comms*
/*kinsta-monitor*
*ao_speedup_cachebuster*
/*removed_item*
/my-account*
/wc-api/*
/edd-api/*
/wp-json*
Strip response cookies on pages that should be cached – No (default). Select ‘Yes’ if you want the responses with cookies to be cached as well. If you think that the caching is not working due to cookies responses and think that these cookies are non-essential for your website, consider turning this option ‘Yes’.
Automatically purge single post cache when a new comment is inserted into the database or when a comment is approved or deleted – No (default), ‘Yes’ if you have a blog or website with high user engagement and comments.
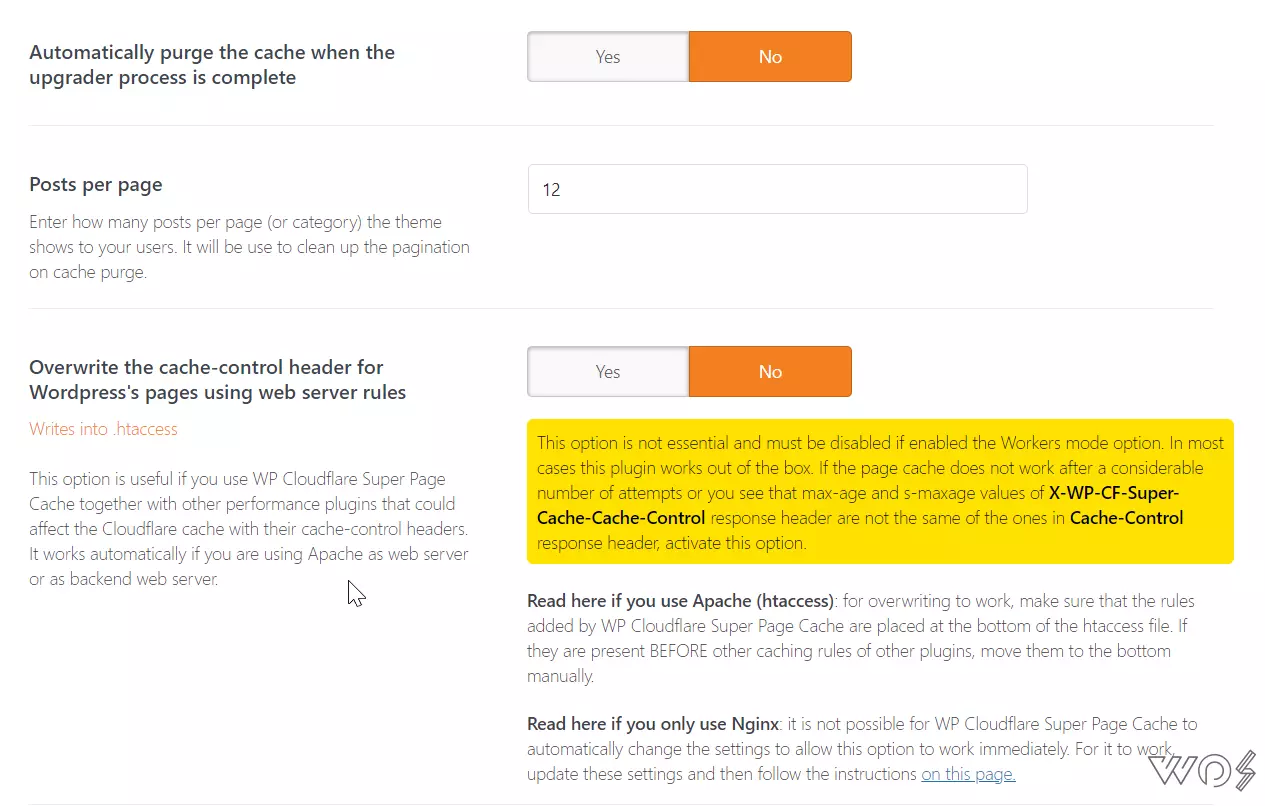
Automatically purge the cache when the upgrader process is complete – No (default). Click on Yes if you want to clear the entire cache if any theme, plugin, or WordPress updates.
Posts per page – 12 (default). Please set it according to your theme’s current posts per page (before pagination).
Overwrite the cache-control header for WordPress’s pages using web server rules – No (default). Try clicking ‘Yes’ if you are running another performance/cache plugin and or some plugin is applying its header settings or the fetched header has a different browser cache-control and Cloudflare cache-control age.
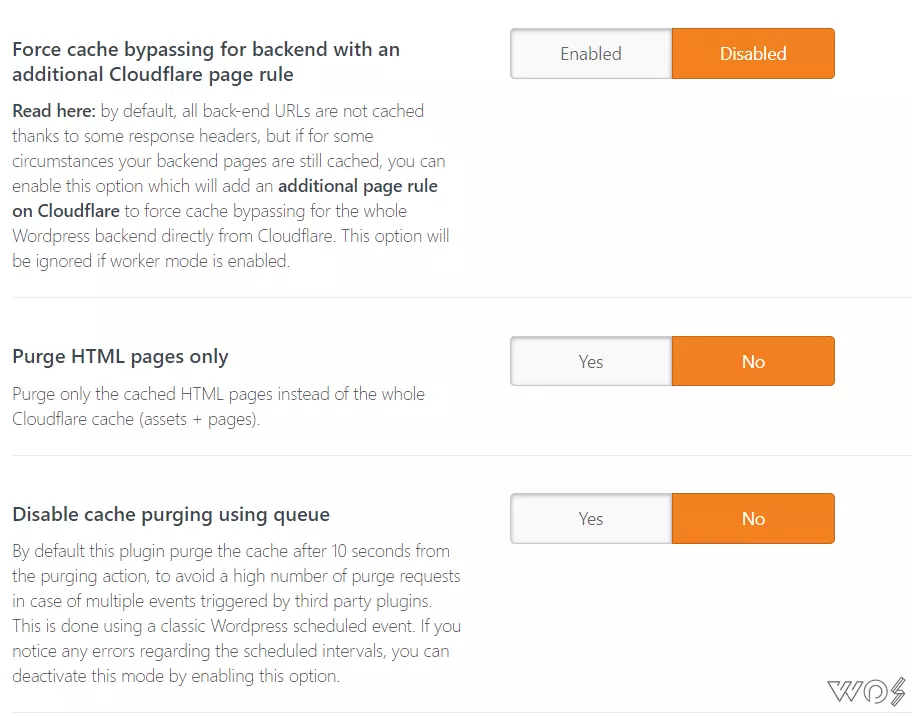
Force cache bypassing for backend with an additional Cloudflare page rule – Disabled (default). If you are seeing the backend getting cached, try hitting the ‘Enable’ button.
Purge HTML pages only – No (Default). If you don’t update images/videos in already published posts/pages, try clicking ‘Yes’ to only purge the HTML of the page instead of all the assets. This may also improve cached %.
Disable cache purging using queue – No (default). By default, Cloudflare purges the cache after 10 seconds. So the changes you will see are after 10 seconds. However, you can hit ‘Yes’ if you don’t want to use queuing and see the changes quickly. It is recommended that you don’t have any other cache plugin except Cloudflare Super Page Cache and have a powerful server (at least 1GB, 1 CPU Cloud/VPS/Dedicated) before disabling it.
CLOUDFLARE WORKERS
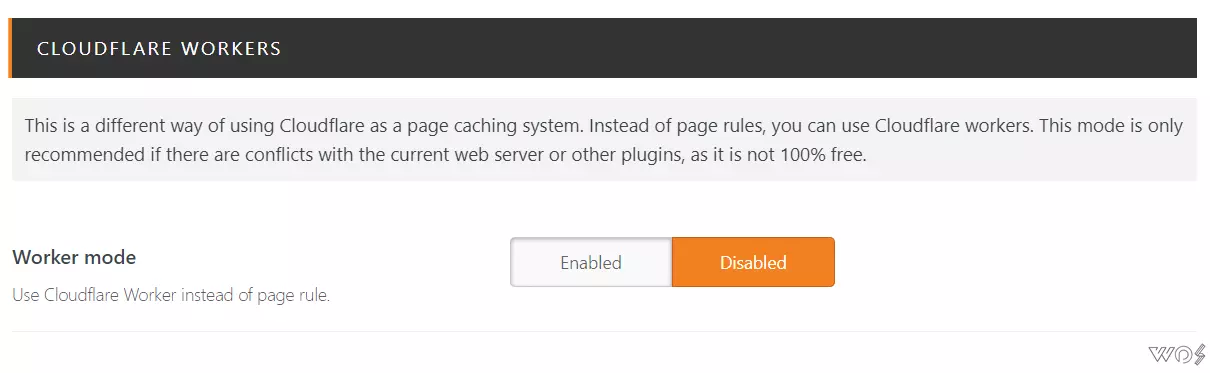
Worker mode – Disabled (default). For low-traffic websites (under 50,000 visits), I recommend turning on Worker mode and setting a Worker in Cloudflare.
Limit for Worker mode on Cloudflare free plan
Worker mode allows you to get headless (no header responses). This is the best option if you have conflicting headers and cache conflicts with other plugins. If you have traffic below 50,000 visits per month, I recommend you to use Cloudflare worker which has a limit of 100,000 daily requests. Moreover, you won’t see that annoying /?swcfpc=1 prefix in the URL in worker mode.
FALLBACK PAGE CACHING
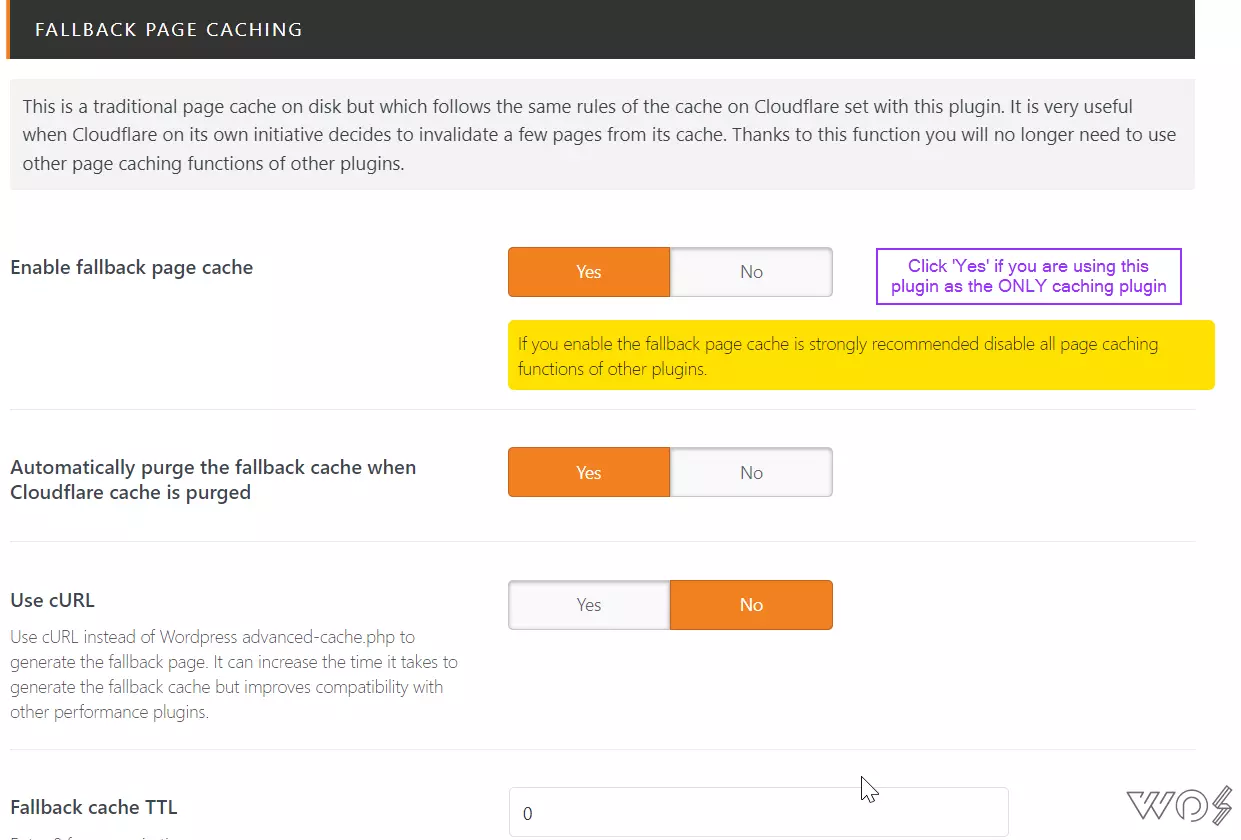
Enable fallback page cache – No (default). Recommended (Yes), if you don’t have any other cache plugin (or its caching turned off). This feature allows you to cache pages on the disk of your website’s server. If Cloudflare doesn’t cache a few pages, this cache will be provided to the visitor. As a result, every visitor will experience a blazing fast-cached website.
Warning! Only Turn Fallback Cache If:
Please use one plugin for cache whether it be Autoptimze/WP Rocket/LS Cache or Cloudflare Super Page Cache if you enable fallback cache.
It is not recommended to run more than 1 page caching plugin.
(if Fallback is enabled) Automatically purge the fallback cache when Cloudflare cache is purged – Yes (default)
(if Fallback is enabled) Use cURL – No (default). If some of your plugins are not compatible with the advanced-cache.php (also used in WP Rocket), try clicking ‘Yes’ to improve compatibility.
(if Fallback is enabled) Fallback cache TTL – 0 (default) which means no expiration. Leave it to 0 since the fallback cache will be cleared automatically once you clear the Cloudflare cache.

(if Fallback is enabled) Prevent the following URIs to be cached – Add the list of pages of which you don’t want the fallback cache to be generated.
(if Fallback is enabled) Bypass fallback cache when these cookies are present in the request packet
^wordpress_logged_in_
^wp-
^comment_
^woocommerce_
^wordpressuser_
^wordpresspass_
^wordpress_sec_
Save response headers – No (default)
Prevent to cache URLs without trailing slash – Yes (default)

BROWSER CACHING
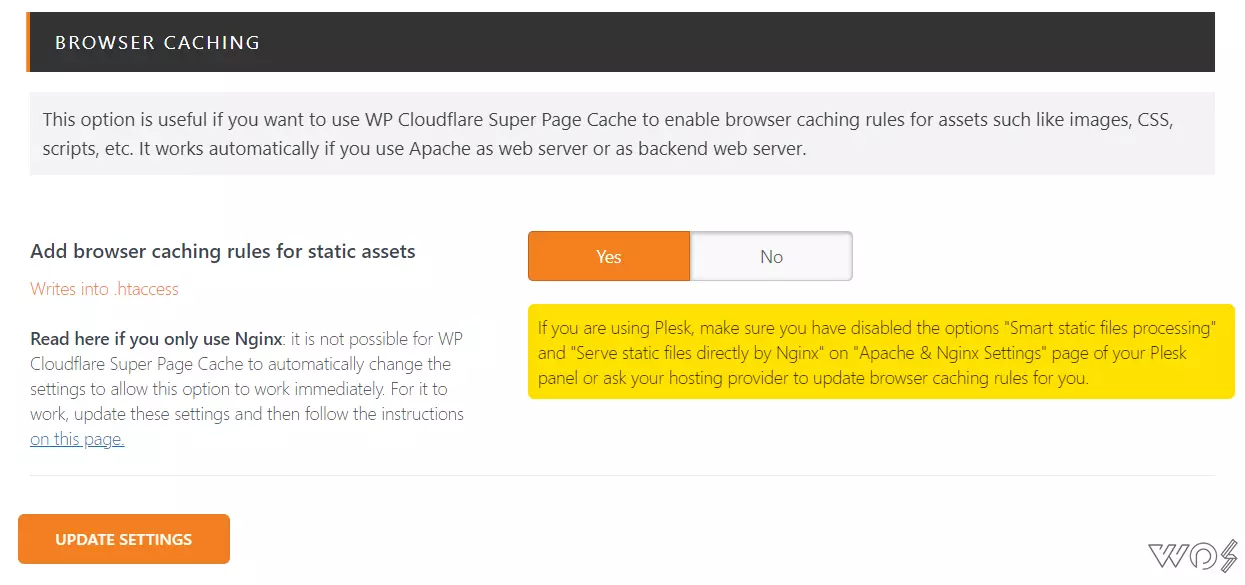
Add browser caching rules for static assets – No (default). Yes (Recommended). If you haven’t set the cache expiration for fonts, images, and other static assets and see such recommendations in speed testing tools, try turning this to ‘Yes’ to add those rules. For Litespeed and Apache, it automatically adds the code in the htaccess file.
For Ngnix, you must add this script to your configuration file:
 location ~* \.(xml|xsl)$ { add_header Cache-Control "no-cache, no-store, must-revalidate, max-age=0"; expires -1; }
location /robots.txt { add_header Cache-Control "no-cache, no-store, must-revalidate, max-age=0"; expires -1; }
location ~* \.(css|js|pdf)$ { add_header Cache-Control "public, must-revalidate, proxy-revalidate, immutable, max-age=2592000, stale-while-revalidate=86400, stale-if-error=604800"; expires 30d; }
location ~* \.(jpg|jpeg|png|gif|ico|eot|swf|svg|webp|avif|ttf|otf|woff|woff2|ogg|mp4|mpeg|avi|mkv|webm|mp3)$ { add_header Cache-Control "public, must-revalidate, proxy-revalidate, immutable, max-age=31536000, stale-while-revalidate=86400, stale-if-error=604800"; expires 365d; }
location /wp-cron.php { add_header Cache-Control "no-cache, no-store, must-revalidate, max-age=0"; expires -1; }
location = /wp-content/wp-cloudflare-super-page-cache/www.yourwebsite.com/debug.log { access_log off; deny all; }
Try replacing www.yourwebsite.com with your actual website’s domain address. This is the same script used for auto purging and overwriting headers for the Nginx server.
Section 2: Advanced
PRELOADER
How does it work?
Whenever you clear the cache, the preloader loads the selected pages/links to the Cloudflare cache in the background, so that such pages/links load as soon as the user clicks on them. However, the preloader also puts too much load on a server. For Cloudflare preloader feature, it reduces the load by adding a 2 seconds pause in between preloading tasks.
Recommendations:
I would recommend turning Preloader ON on:
- A Dedicated or VPS/cloud hosting with at least 1 CPU and 512MB RAM
- Shared hosting with low visitors (15,000 visitors/months)
Yet every website is different so do try turning it ON and if it doesn’t slow your frontend and backend, try leaving it On.
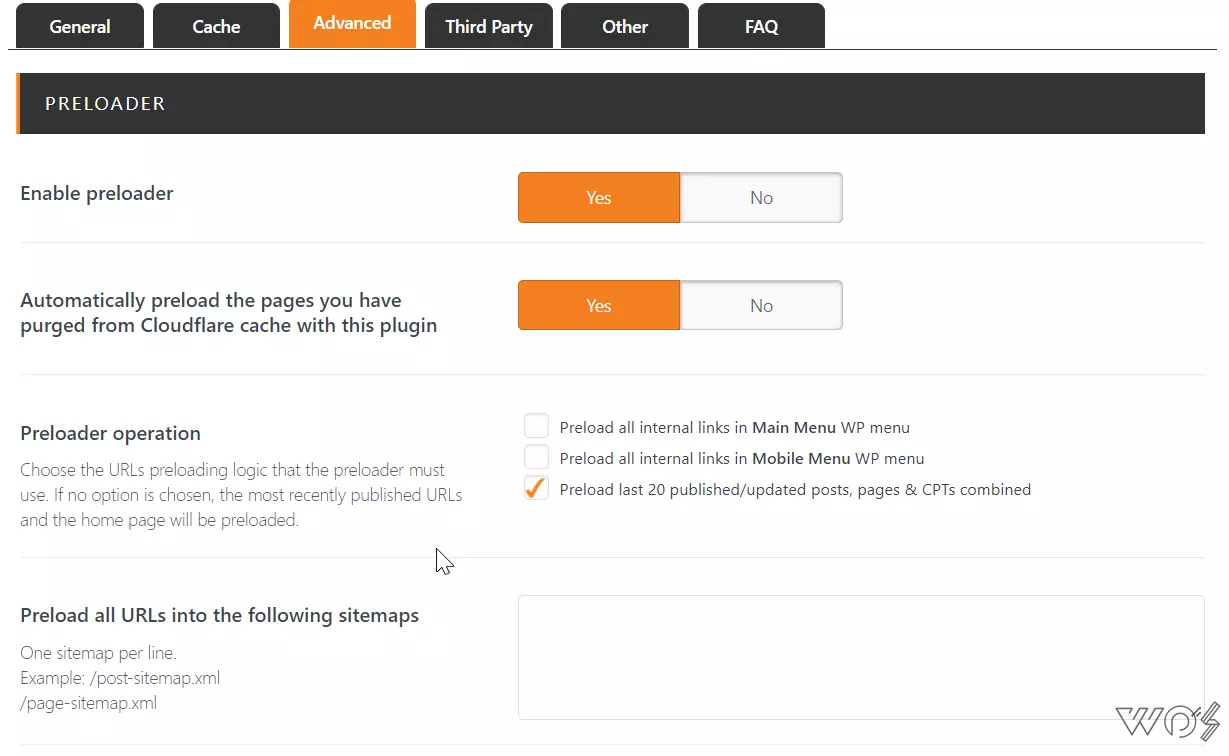
Enable preloader – Yes (by default)
Automatically preload the pages you have purged from the Cloudflare cache with this plugin – Yes
Preloader operation – Preload last 20 published/updated posts, pages & CPTs combined
Preload all URLs into the following sitemaps: This allows you to preload all the posts/pages in a sitemap.xml URL. If you don’t have sitemaps with 1000 URLs per sitemap, it might be a good option to add the sitemap.
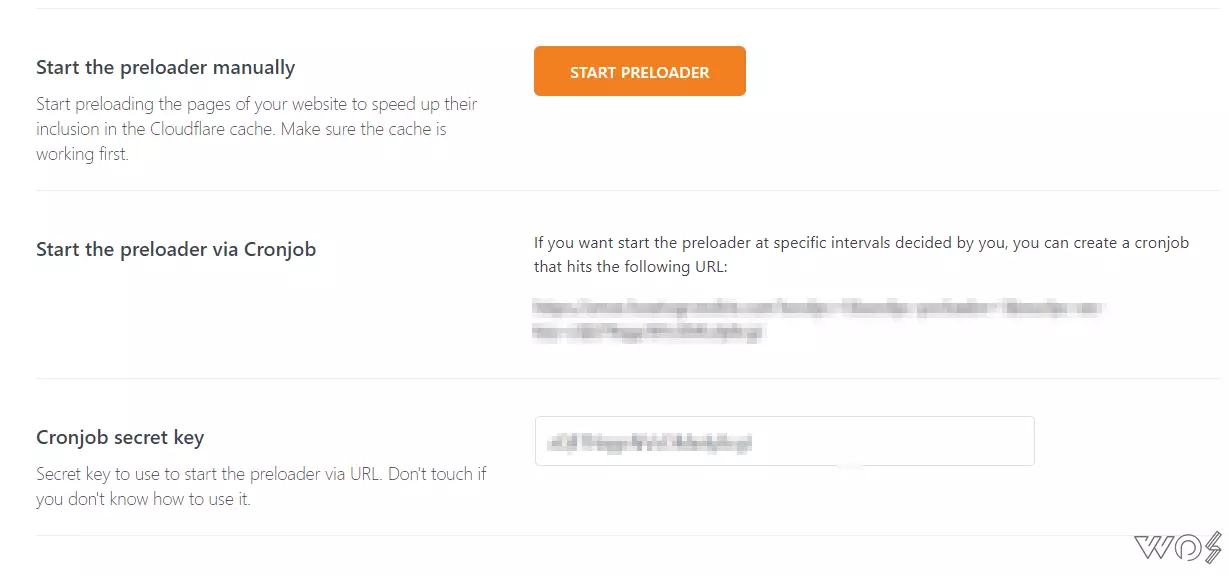
Start the preloader manually – Click this if you want to manually preload at the current time.
Start the preloader via Cronjob – If you want to preload on a schedule, you must create a custom cronjob on your hosting platform or from WP’s default cron job via a plugin. I haven’t created a schedule because I prefer auto-preloading after cache clearing.
VARNISH SETTINGS

Varnish Support – No (by default). I recommend that you click ‘Yes’ if you are using Varnish on your hosting platform such as Cloudways. If not then some
- Hostname: localhost or IP address of server if on Cloudways
- Port: 6081
- HTTP method for single page cache purge: PURGE
- HTTP method for whole page cache purge: PURGE
- Cloudways Varnish: No (default) if not on Cloudways. Yes, if on Cloudways
- Automatically purge Varnish cache when the Cloudflare cache is purged – Yes
OTHER

Automatically purge the OPcache when Cloudflare cache is purged – Yes
Automatically purge the object cache when Cloudflare cache is purged – Yes (if you have Redis working). No, if you don’t have Redis.
Section 3: Third-Party
If you have any plugin working on the website from the list below, do tick the settings of that plugin.
- Woocommerce
- Easy Digital Downloads
- Autoptimize
- Litespeed Cache
- Hummingbird
- WP-Optimize
- Flying Press
- WP Rocket
- WP Asset Clean Up
- NGINX Helper
- WP Performance
- Yet Another Stars Rating (YASR)
- Swift Performance
- Siteground
- WP Engine
- Spinupwp
- Kinsta
Turn OFF caching feature of other cache plugins
It is recommended to either disable the cache plugin completely if you only use it for caching, or at least disable it if you use that plugin for other optimizations like minifying and combining.
Section 4: Other
LOGS
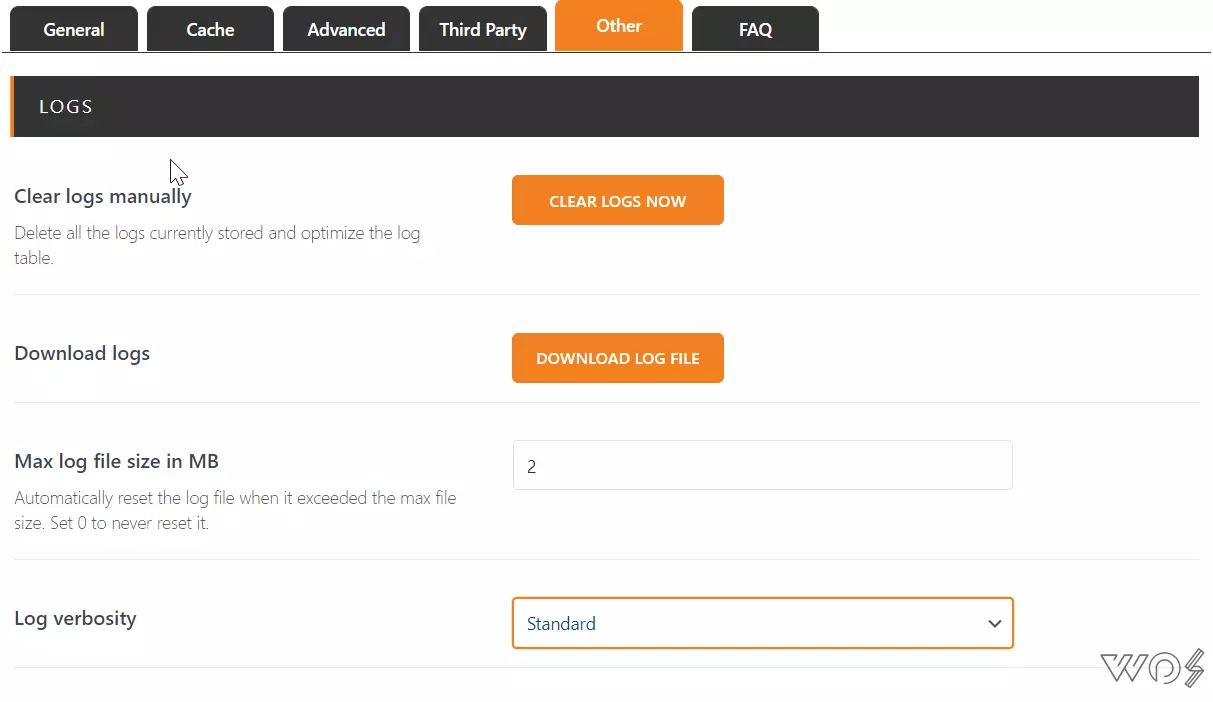
Log verbosity – Standard (default) (if the plugin is working correctly). High (if you are facing any problem with the plugin)
OTHER SETTINGS
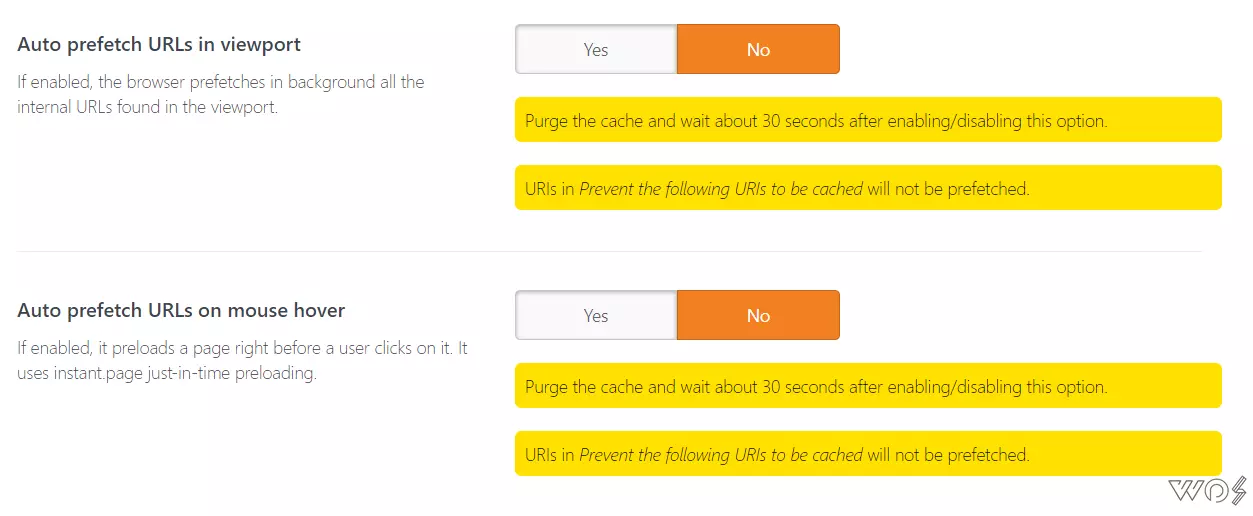
Auto prefetch URLs in viewport – No (default). Click ‘Yes‘ on Dedicated or Cloud/VPS Hosting with at least 1GB RAM. Loads all the visible links available on the page’s section.
Auto prefetch URLs on mouse hover – No (default). Click ‘Yes‘ (recommended) on Dedicated or Cloud/VPS Hosting with at least 512MB RAM. Loads a link when the user hovers the pointer on it. Much less resource-consuming than the above one.
Summing up
It’s time to end this tutorial. Let me know in the comments section below if you faced any problems while setting this plugin. I’ll be happy to assist you.